February 15, 2024

In the last issue we went through the workflow of a data scientist and where exactly kubernetes can prove to be a useful base on which to build a platform for it.
In this issue let’s go through a simple example to gain hands on experience for the same.
Prerequisites
- Docker - https://docs.docker.com/get-docker/ - To launch the cluster nodes as containers
- kubectl - https://kubernetes.io/docs/tasks/tools/#kubectl - A cli tool to interact with a running kubernetes cluster.
Setting up a playground
Before starting we need a playground to perform the demo. We will set up a kubernetes cluster on the local machine to do this. Although a cluster should contain multiple nodes for fault tolerance and high availability, we will mimic that behaviour using an awesome tool kind (kubernetes-in-docker).
At the end of this section we will have multiple containers running with each container acting as a separate cluster node.
Installation
Follow the directions provided here
Test the installation by running
$ kind --version
kind version 0.14.0
Launching the cluster
Now we start a local cluster using kind. We will create one control plane and two worker nodes. It is possible to have multiple of both.
<aside> 💡 Kubernetes can have multiple control plane and worker nodes. All the centralised cluster management components live on the control plane nodes while user workload run on worker nodes. Read more here
</aside>
First, create a kind configuration in a file called kind-config.yaml. You can find it here. This will define the structure of our cluster -
kind: Cluster
apiVersion: kind.x-k8s.io/v1alpha4
nodes:
- role: control-plane
- role: worker
- role: worker
Here, we have defined three nodes with one in the role of control plane and other two as worker nodes.
Launch a cluster using this config. This might take some time. Make sure docker daemon is up on your system before executing this -
$ kind create cluster --config kind-config.yaml
...
Thanks for using kind! 😊
Lets run kubectl to make sure our cluster is up -
$ kubectl cluster-info
Kubernetes control plane is running at <https://127.0.0.1:63122>
CoreDNS is running at <https://127.0.0.1:63122/api/v1/namespaces/kube-system/services/kube-dns:dns/proxy>
...
This tells us that the cluster is indeed up. We can also see the individual containers acting as nodes by executing docker ps.
Architecture
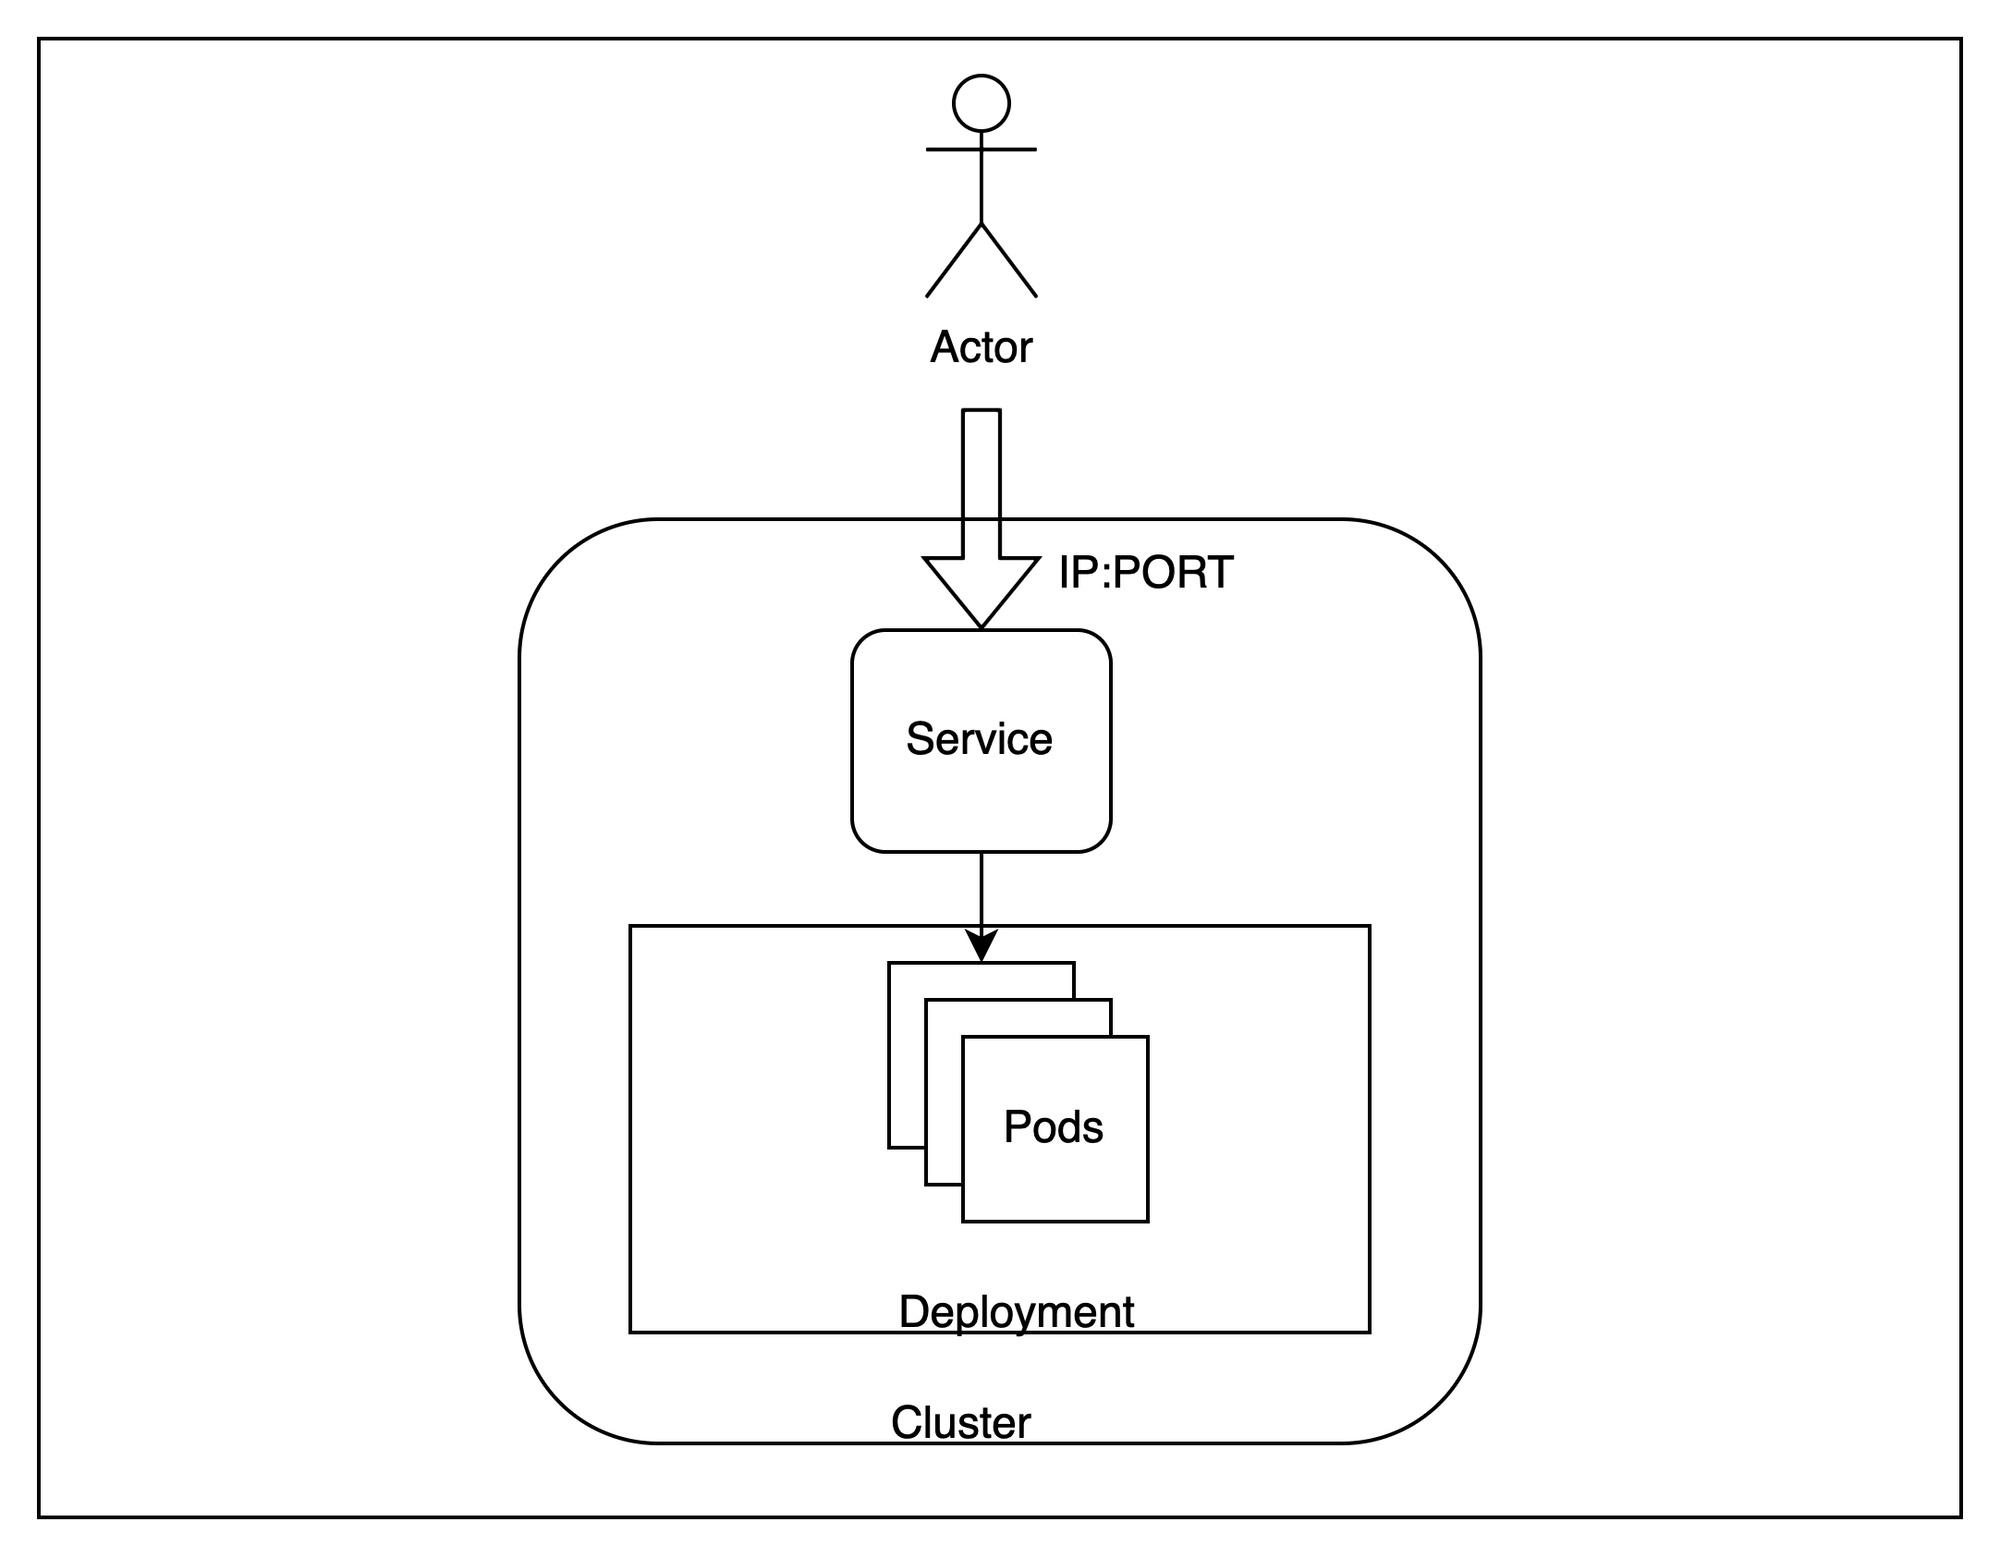
With our cluster up, let’s look at a broad architecture of what we are about to provision.
Broadly speaking, we will host multiple replicas of our application inside the cluster and try to access them from outside with requests being load balanced across the different instances.
To achieve this, there are a few kubernetes specific terminology that we need to be aware of -
Pod- Pods are the smallest deployable units of computing that you can create and manage in Kubernetes. In our case, one instance of the application will be running inside one independent pod. These are ephemeral resources and control plane can move them across nodes if needed.Deployment- A deployment is useful where we want to have more than one replicas for an application. Kubernetes tries to always maintain the number of replicas to be equal to what is provided in a deployment. We will create three identical replicas for our application.Service- A service is useful to load balance across a set of pods running on the cluster. Since pods are essentially ephemeral and can be replaced at any time, service provides a stable interface to access the pods running behind it. We will use a service to test our application.
These three resources will enable us to host a scalable endpoint for serving our application.
Preparing the image
With the cluster up, we can now deploy an application and test it out. We will create an application using the popular iris classifier dataset.
Clone the repo
The repo is available at https://github.com/shubham-rai-tf/iris-classifier-kubernetes. It already contains the code for building and serving predictions at /iris/classify_iris endpoint using fastapi.
Building the docker image
We need to package this code in a docker image to prepare it for kubernetes. A Dockerfile is provided in the repo for doing that - here.
This Dockerfile specifies the image we will need to create a container hosting the prediction endpoints in a uvicorn server on port 5000. More details about the syntax is available here.
Execute this command to build a local image -
$ docker build . -t iris-classifier:poc
...
$ docker image ls
REPOSITORY       TAG  IMAGE ID      CREATED         SIZE
iris-classifier  poc  549913d5b1f9  12 seconds ago  737MB
We can see that the image has been successfully created with name iris-classifier and tag poc. We will now load this image into the cluster to use it inside the cluster
Loading the image
<aside> 💡 This step is only needed because we don’t have an image registry to pull the newly built image from. In production, the image should be hosted in a private registry like Dockerhub or AWS ECR and then pulled into the cluster directly
</aside>
Execute this command to load the locally built image to the cluster -
$ kind load docker-image iris-classifier:poc
Image: "iris-classifier:poc" with ID "sha256:549913d5b1f9456a4beedc73e04c3c0ad70da8691a8745a6b56a4f483c4f0862" not yet present on node "kind-worker2", loading...
Image: "iris-classifier:poc" with ID "sha256:549913d5b1f9456a4beedc73e04c3c0ad70da8691a8745a6b56a4f483c4f0862" not yet present on node "kind-control-plane", loading...
...
You can verify that the images have been loaded by listing images inside any of the three containers -
$ docker exec -it kind-worker crictl images
IMAGE                                TAG    IMAGE ID         SIZE
docker.io/library/iris-classifier    poc    549913d5b1f94    753MB
Deploying to kubernetes
Kubernetes is essentially a declarative system. That means, we describe the contours of what we want to do and control plane components constantly drive the system towards reaching that state.
To implement the architecture we discussed earlier, we will describe our intent in the form of a yaml file which acts as a record of intent. In kubernetes parlance these are called manifests.
All kubernetes manifests have the following fields -
apiVersion- Multiple resources are grouped together in same api versions. This provides a standardised way of deprecating or promoting a resource across kubernetes versions.kind- Identifies the exact object type that is to be createdmetadata- Contains fields that act as metadata for the created object. TheapiVersion,kindandmetadata.namefields together identify a unique resource inside anamespacespec- This field contains the specification for the object to be created. Every kind defines its own structure for this field with its own implementation.
We will use the manifests present in the repo in files within the manifests directory here.
It defines two kubernetes resources, Deployment and Service in deployment.yaml and service.yaml respectively. Let’s go through both the sections.
Deployment
apiVersion: apps/v1
kind: Deployment
spec:
	# number of replicas
  replicas: 3
  template:
    spec:
      containers:
			# name of the image
      - image: iris-classifier:poc
        name: iris-classifier
The deployment manifest in deployment.yaml majorly defines the pod spec we want to deploy in terms of the image name and the number of replicas. Once we apply this, kubernetes will constantly take steps to maintain the number of replicas to what we specify here.
Service
apiVersion: v1
kind: Service
spec:
	# Type of the service
  type: ClusterIP
  ports:
	# Port where the service will be accessible
  - port: 8080
		# Port on the container where the traffic is to be forwarded
    targetPort: 5000
    protocol: TCP
  selector:
    app: iris-classifier
The service manifest in service.yaml defines how to load balance across the replicas created by the deployment. Here we have defined how the port on service is to be mapped to port on the containers. Since our application runs at port 5000, the targetPort is set to 5000. The service is exposed on port 8080. TCP traffic sent to 8080 will be load balanced across port 5000 on the containers.
Applying the manifests
Run the following command to apply the manifests to kubernetes -
$ kubectl apply -f manifests/
deployment.apps/iris-classifier created
service/iris-classifier created
Both resources are successfully created on the cluster. We can verify running the following commands -
$ kubectl get service iris-classifier
NAME              TYPE        CLUSTER-IP      EXTERNAL-IP   PORT(S)    AGE
iris-classifier   ClusterIP   10.96.107.238   <none>        8080/TCP   37m
$ kubectl get deployment iris-classifier
NAME              READY   UP-TO-DATE   AVAILABLE   AGE
iris-classifier   3/3     3            3           38m
$ kubectl get pods
NAME                               READY   STATUS    RESTARTS   AGE
iris-classifier-5d97498ff9-77wqw   1/1     Running   0          39m
iris-classifier-5d97498ff9-8twjm   1/1     Running   0          39m
iris-classifier-5d97498ff9-znrz8   1/1     Running   0          39m
As we can see, the service is exposed at port 8080 and three pods have been created as we specified.
Modify deployment.yaml to have 2 replicas instead of 3 and re-apply. Kubernetes will delete one of the replicas to match the spec.
Making the prediction
Now that the resources have been created in the cluster, we can verify our deployment by calling the model using the service endpoint. Since we are using a local setup, we will have to port-forward the service to a port on the local machine.
<aside> 💡 In a cloud provider setup, this service will be bound to an external load balancer which can be accessed from the internet if needed.
</aside>
Run the following command to perform port forwarding for the service -
$ kubectl port-forward services/iris-classifier 8080
Forwarding from 127.0.0.1:8080 -> 5000
Forwarding from [::1]:8080 -> 5000
We can verify by calling the /healthcheck endpoint on the model -
$ curl '<http://localhost:8080/healthcheck>'
"Iris classifier is ready!"
To perform a test prediction, we will send a sample input to get a prediction -
$ curl '<http://localhost:8080/iris/classify_iris>' -X POST \\
	-H 'Content-Type: application/json' \\
	-d '{"sepal_length": 2, "sepal_width": 4, "petal_length": 2, "petal_width": 4}'
{"class":"setosa","probability":0.99}
We get a prediction of class setosa with a 99% probability. By running multiple of these predictions, we can verify that the requests are indeed being routed to different pods in a round robin fashion.
Cleanup
Let’s remove all the kubernetes resources we had installed first -
$ kubectl delete -f manifests/
This will cleanup all the kubernetes resources we had created in the previous sections. Now we can take down the cluster as well -
$ kind delete cluster
Deleting cluster "kind" ...
Conclusion
In this issue we went through how to host a model as a callable service in kubernetes. Although this was a toy example where we built a docker image locally and ran it on a cluster running on the same machine, a typical production setup works on similar principles. A lot can be achieved with just these two resources.
In the subsequent issues we will explore other more advanced features like multi tenancy and access control which become essential as we move towards day 2 operations.

Subscribe to our Newsletter

Delivered twice a month
Join AI/ML leaders for the latest on product, community, and GenAI developments